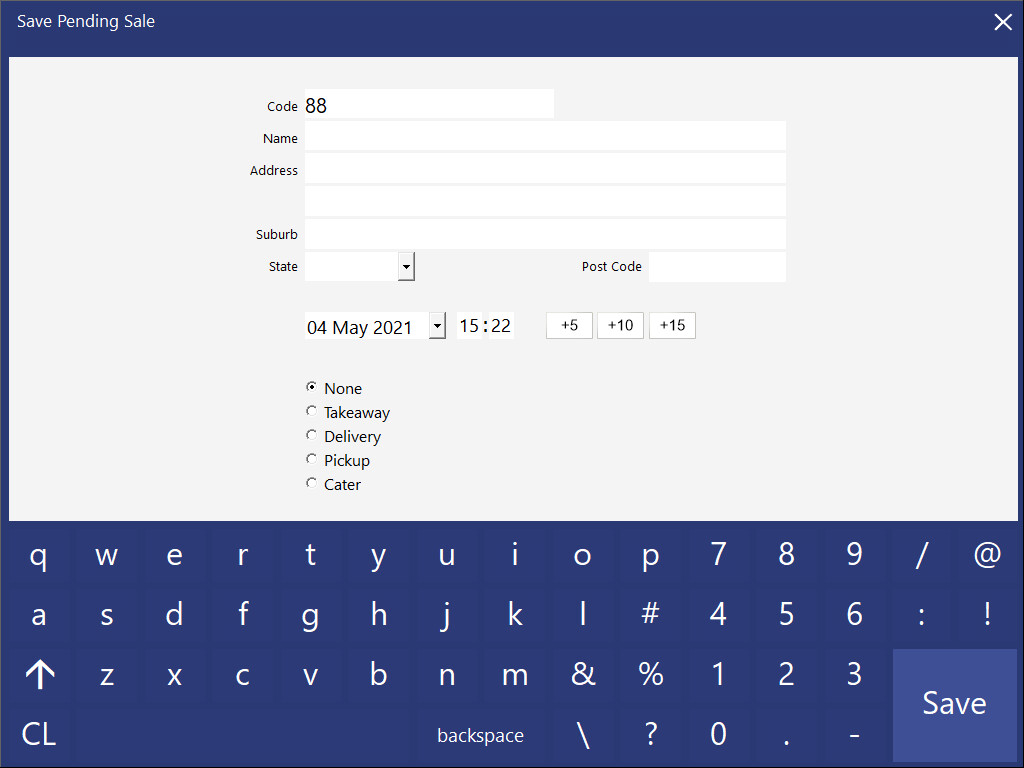
Add items to the sale as per a normal.
Instead of finalising the sale, press the Pending Sale button.
The Save Pending Sale screen will open where you enter the details for the sale you want to save.
The only information that is required by POS is the Code, the others are optional.
If you are saving a Pending Sale for a customer that’s in your database, these fields will be automatically filled in with the available data from the customer record.
Choose a Sales Type to help staff identify what is required of the sale items.
For example; Takeaway will ensure that it is prepared in takeaway containers.
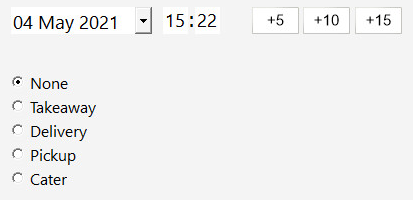
You can select the times and dates when the sale is required, and add time quickly by pressing the +5, +10 and +15 buttons.
These buttons will add 5, 10 and 15 minutes to the order time respectively and can be pressed multiple times to add longer time periods.
Tip!
Sale Type statuses can be configured in Back Office > Setup > Global Options > Sales > Sale Type Status.
A total of 9 Sale Type status slots are available.
The number of Sale Type statuses shown on the Save Pending Sale screen will correspond to the number of Sale Type statuses that are populated in Global Options.
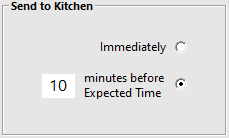
This option will appear on the bottom-right corner of the Save Pending Sale window if the option "Kitchen Print minutes before Expected Time" has been enabled in:
Setup > Global Options > Sales > Pending Sales.
The number of minutes shown are pre-filled using the value configured for this option in the Global Options as mentioned above.
The purpose of this function is to delay printing the Pending Sale to the Kitchen Docket Printer(s) until a specified number of minutes before the Expected Time.
This will ensure that the Chef begins preparation after receiving the order via the Kitchen Printer(s) so that the order is fresh and hot when required by the Customer.
The Clerk can either use the default number of minutes as configured in: Global Options, change the number of minutes before Expected Time, or they can choose to send the order to the Kitchen Docket Printer(s) immediately.
The action selected under "Send to Kitchen" action will be taken after Pending Sale has been saved.
Note that Kitchen Printers must be configured and the Print to Docket Printers option must be enabled in:
Setup > Global Options > Sales > Pending Sales > Print to Docket Printers.
Note!
In order for the Order to be printed to the Kitchen using the number of minutes before the Expected time, the POS Terminal must be turned on and Idealpos must be running when the due time for sending the order lapses.
If the POS Terminal is turned off or if Idealpos is closed at the number of minutes before the Expected Time, the order will not be sent to the Kitchen.
After you have entered all the details you require, press the Save button.
If Send to Kitchen has been set to print Immediately and Print to Docket Printers has been enabled in: Setup > Global Options > Sales > Pending Sales > Print to Docket Printers, the Kitchen Docket will be printed immediately to the Kitchen Printers.
If the "# minutes before Expected Time" has been chosen and Print to Docket Printers has been enabled, the Kitchen Docket will be printed when the required time has lapsed.
It should be noted that the "Send to Kitchen" (Immediately or # minutes before Expected Time) is only applicable to Kitchen Printers/Docket Printers.
It does not apply to the "Print to Windows Printer" option for Pending Sales.
If "Print to Windows Printer" has been enabled in: Setup > Global Options > Sales > Pending Sales > Print to Windows Printer, the Pending Sale will be printed to the Windows Printer immediately after the Pending Sale has been saved, regardless of the option chosen under the "Send to Kitchen" function shown above.
If any there were any Promotions triggered in the Pending Sale, they will also be displayed on the printout.